Social Icons

Pages

Monday, 17 December 2012

【Wordsift】: The Word Cloud Generator

What is Word Cloud?


This is an example of a word cloud? What do you think the topic is about?

Word Cloud turns text into a visual representation or an information graphic. They are easily created by pasting text in any language into a free word cloud generator, such as Wordsift and Wordle. The word clouds, or visual representations of text, give prominence to words that appear more frequently from the original text – in other words, the more frequently a word appears in the text, the larger its size in the visual design. Besides, users can normally print out their clouds or embed them into their blogs or websites.


         Introducing WordSift. How to use it?


WordSift (http://www.wordsift.com/is an online word cloud generator that I found very useful in certain aspects in teaching language. Its webpage is very straight forward and easy to use. There are just two steps to create your own word cloud:
  • Copy your text and paste it in the box at the homepage
  • Press "sift" to visualise your text

These are all you have to do! ;)


  Why do teachers and students like WordSift?


What I like about WordSift is that actually not just about it can create pretty images with words, instead, this website can also be a great visualisation tool that can become a catalyst for discovery, understanding, insight and discussion with students about a particular text or texts!

The following are some of the functions that WordSift can perform:


Concordance Analysis

1. If any of the words in your word cloud is clicked, you will be shown at the bottom of the page that how this particular chosen word is used in the text that you have pasted in. it is effectively concordance analysis of the words in the text. Hence, it is a potentially great tool in just focus on a/ some word(s) and teachers can use this opportunity to highlight the different usages of the same word in the passage to their students.

As soon as the word "Atmosphere" is being chosen, WordSift will automatically show you where this particular word is used in your text.

Organise words based on Frequency of use, 

Alphabets and Genres


Word Cloud for a text about Greenhouse Effects
The word cloud will show you the 50 most frequent words which are used in the text you have pasted in and they are sized differently based on the frequency of use of the certain word in the text. For example (See the left), I have pasted a text about greenhouse effects in WordSift. Then, my word cloud have had all the most frequently used words such as atmosphere, greenhouse, earth. energy, gases and global appeared in larger size compared to the rest.

Besides, WordSift enables users to organise the words based on their frequency of use in English. In this way, students can straight away view the differences very clearly and learn some of the most common words used in English. To organise the words, you can just click on “common to rare” or “rare to common”. In addition, you can also organise the words alphabetically and you can also use it to analyse words from different genres. For example, you can choose to highlight all the words related to either Science, Math, Academic Writing, General Services and etc. (See below)
 After I clicked on the "Science" button in the "Mark" column, all the words related to Science is highlighted in RED colour 


Show words related images, videos & Thesaurus

What's interesting is, WordSift will present a series of pictures and videos which are related to the selected words in order to assist the users to understand the words meaning quickly and more in depth. Moreover, if you click on any of the words in the word cloud, you will also see a visual thesaurus where the word and its related meanings are shown pictorially. 


When I click on the word "atmosphere", 
images and videos related as well as thesaurus are shown at the bottom of the page.


How can WordSift be used in an ELT context?


Prediction

  1. The teacher creates a cloud and then show it to the students in the class. 
  2. Based on the cloud, students have to predict what the topic is or what the content of the text might be. 
  3. Perhaps some comprehension questions can be asked by the teacher as well, and students have to predict the answers by referring to the cloud. 
It will be so interesting to contrast the students' predictions about the text when looking at the cloud and then what the actual content of the text is. In fact, this activity can be carried out as a class activity or teacher can print out clouds and give them out in groups.

Dealing with vocabulary

  1. You can paste a text which you want your students to read later into WordSift and produce a cloud.
  2. Then, ask the students to look at the cloud and choose 3 words they do not understand. 
Benefits: 
  1. It is time saving and easier for the teacher to deal with the vocabulary problems since students do not need to read through the whole text but instead, just look for the unfamiliar vocabulary items within the 50 most frequently used words in the text. 
  2. It is easier for teacher to mainly focus on the most common/ important keywords in the text because those words are put in a larger font size. Therefore, teacher can only choose to explain the meaning of the big-sized words to students. Whereas the rest can be skipped since do not understand about the meaning of those words would not really affect the students' comprehension of the text.

Comparisons

  1. Get students to make word clouds of their own essays. They can make them at home, print them out and then bring them into the class.
  2. In the class, students can be put into pairs. 
  3. Have Student A to predict 3 contents of the essay from student B’s cloud and student B does the same with student A’s cloud. 
  4. ** If all the students have written the same composition, then students could compare their clouds to see which words they have in common and write them down in a list.

Some limitations of wordsift

  1. Not colourful enough / Only have one font type 

The cloud produced are all in green colour and if you clicked on some words or genres, those word will change to red colour. That's it! Hence it would be kind of boring for students because most students like colourful stuffs with pictures.

  2. The clouds produced are not in certain shape but randomly arranged.

Unlike Tagxedo and Wordle (another two word cloud generators), Wordsift does not have the function to arrange its cloud into certain shapes and therefore, makes the appearance of the cloud rather dull.

As you can see below, the cloud produced by Tagxedo and Wordle are much more colourful and good looking than that from WordSift. And they have different font types to be chosen from too!

Examples of clouds from Tagxedo:


Examples of clouds from Wordle:


===

Saturday, 8 December 2012

【Zimmer Twins】: Directing your own stories

What is The Zimmer Twins?


The Zimmer Twins (http://www.zimmertwins.com/) is known for its unique format which combines online participation and broadcast delivery. Young language learners are invited to create and share animated episodes using a story editor and library of animation. The users can either create endings to short, professionally produced story-starters or produce a totally new story based on their imagination. Users tell their stories by choosing characters, actions, props, expressions and settings. They can also add their own dialogue and on-screen text. Then, a selection of the user-generated episodes is produced into broadcast shorts and air on Teletoon, which is a Canadian Animation Network.


Below is an interesting Youtube video on "The Making of The Zimmer Twins" :


How to use The Zimmer Twins?


1. Click on the "Make a Movie" button and you will be brought to this page.

In order to have your clip saved, you must sign up yourself first to get an account for the Zimmer Twins page. After that, you can start making your own movie clip.  Click here to watch a tutorial clip on how to get started with your first Zimmer Twins movie!


1. You can either choose to create endings to short, professionally produced story-starters or produce a totally new story based on your own imagination. If you choose the previous, you need to pick a story-starter from the selection on the screen; but if you choose to create your own, you can click in the "Make From Scratch" button.

Then you will be brought to this story editor where you can start creating your story 

2. From the story editor, you can get many varieties of animation selection, such as you can choose your own characters, settings and props. After that, you are free to decide each character's facial expressions, emotions as well as actions. Also, you can add on dialogue and on screen text on your short animation clip. This is so fun! Even me as a teacher feel so exciting in creating my own animation. Look at the slide show below, it shows you a series of animated files which Zimmer Twins offers: 


3. After you have finished narrating your story, just click on "save movie" button before you put in a lovely title and short description for your story.

For more information on how to use the Zimmer Twins, please view the teaching video below prepared by Russel Stannard:  http://www.teachertrainingvideos.com/zimmer/index.html


Why do teacher and students like the Zimmer Twins?


1. Autonomous learning 

Students will become more independent in learning because they are the one who in charge for every tiny part of their movies. They can do whatever they want, such as choosing their favourite characters, deciding on the characters' lines, story background and etc. Students' thinking skills can be also enhanced greatly as they produce the movies all by themselves, and perhaps with only some guidance from the teacher.

2. Fun and Motivating

Zimmer Twins offers different characters with different personalities and traits for the students to choose from. The characters can sing and dance, can travel on time and do some craziest stuffs. It totally opens up the door of possibilities of what the students can actually think of. The anticipation and preparation of students to add dialogue, select scenes and come up with their own story endings are absolutely worth while and amazing! It is really cool when you see that students come out with different stories every time and you can totally enjoy their awesomeness!

3. Sense of ownership

Students will have a sense of ownership towards their finished works because they have put in a lot of effort in organising their ideas and present their story in a nice and favourable way. Therefore, after putting in so much hard work, they will feel proud of it and enjoy the feeling when people appreciate their works.

How could Zimmer Twins be used in language learning context?


1.  Teacher sets a context and has the students to create a story about it

As you can see from the heading that a teacher can actually provide the students with an interesting title or context such as sports day, rescuing someone from a difficult situation, an argument and etc. Then gives the students more room to imagine themselves about how they want the story line to be. At the same time, the teacher can introduce the students to a meaningful set of vocabulary related to that particular context so that they can put the vocabulary items into usage when they are setting up their own stories. After all, the movie making has been turned into a kind of personal process where the students can do whatever they want in the movie before publish it to their audience. In fact, not only the activity encourages students autonomy and creativity, but also helps them in contextualising a situation/incident and learning to use suitable words to describe it.

2. Students create story endings based on the story starters

Like what you can see in Zimmer Twins' page, students are given the opportunity to continue progressing the story line of some uncompleted movies into the complete ones. Hence, the short plus professionally produced story starter can assist students to activate their background knowledge about some events, and then they come out with some extraordinary ideas to finish the story. Students are given freedom and right to decide how the ending of the story would be. Therefore, this can highly motivate them as different students have different creativity level. Besides, students will feel so much delighted if they can share and exchange ideas on each other's story.


Some limitations of The Zimmer Twins


1. Movie cannot be embedded


The biggest limitation of Zimmer Twins is it does not allow the users to embed their finished works into any other websites or blogs. This is kind of sad because students cannot share their works with other people who are not Zimmer Twins users.

2. Have to pay for VIP Membership

The users have to purchase VIP membership so that they can publish their movies publicly and have other users watching them.


Thursday, 1 November 2012

【Vocaroo Voice Message】: The voice recording service


What is Vocaroo?


Vocaroo- The premier voice recording service

Vocaroo (http://vocaroo.com/) is an easy and free service that allows users to create audio recordings for use in slide shows or in blogs and websites without the need to install any software. You do not even have to create an account to use Vocaroo. All you need to provide is a microphone.

How to use Vocaroo?


To create a recording just go to Vocaroo.com, click record, grant Vocaroo access to your microphone, and start talking. After completing your recording, Vocaroo gives you the choice to publish it or to scrap it and try again. When you press "publish" and embed the code in your website, you will see a lovely little player which you could click to play your voice.


Step 1:  Go to Vocaroo webpage, and when you are ready,
press on "Click to Record" button to start your recording.

When you have finished your speech, press "click to stop".

Then it lets you to rerecord again if you are unhappy with your recording.
If not, click the link to save.

Ok, it's now pretty much done.
Now you can copy the code and embed
into your blog or website that you would like to.


Below is an example of audio file I have recorded:


Why do teacher and students like Vocaroo?


1. Free and Easy 

Vocaroo has a clean webpage and it allows teacher and students to start recording straight away without having to sign up to be a member or install any additional software. And the instruction in its website is clear enough, even first time users can definitely understand how to use it. Vocaroo also allows users to download the recorded audio and save it as MP3. 

2. No fixed limit on message length 

This means that teacher and students can use Vocaroo to record as long message as they like. However, people have to be aware that even brief internet connection outages can cause recording to be stopped or to fail, and with longer recordings the chance of this increases. Despite of these, I still believe that no fixed limit for recording time is always the biggest benefit of Vocaroo.

3. Time Saving

Teacher and students can use Vocaroo at home to record their speech beforehand and directly play it in the classroom. For example, teacher can assign a task for students and have them to respond through Vocaroo at home and embed the link of their responses into their blogs. The students do not have to stand up one by one and tell the teacher their stories. Besides, if the teacher was unable to come to school on a particular day, he/she can also inform students to listen to his/her pre-recorded Vocaroo file from the class blog so that they won't miss the content of the class.


How can Vocaroo be used in a language learning context?

1. Story Telling

The teacher can start the lesson by showing an example to students- telling them a story, for example on the topic of "the most happiest day in my life". After that, teacher has students divide themselves into groups of 3 to 4. This is to provide them more practising opportunity later on when they narrate their stories to the group members before recording. Then, the teacher can offer students some stimulus by asking them some guiding questions such as "What has happened in the day?", "Which situation made you so happy?", "Who was in the scene?" and so forth. After that, teacher can have students to record at home, either in pair or individual and post it in class blog. Then teacher can provide feedback to students on the pace/organisation/grammar of the story. The students with the best stories can also come in front to present to the whole class in the next lesson.


2. Information gap activity

Teacher starts the lesson by giving the students an extract (the beginning part) of a story in the class blog. Or another way to provide the students with stimulus is by showing students some pictures. Then the story continues to go on by having a student to record a short piece of story recording everyday. The teacher can have students to draw lot before starting to decide the students' sequence of continuing the story. This activity is kind of engaging and motivating because there is an information gap and the students feel curious and they want to know how other students are going to continue the story. In this way, their interest and motivation are aroused. And at the same time, their oral skill are trained because they have to organise their ideas and sentences as well as to choose the right words so that they message can be conveyed effectively.


SOME LIMITATIONS OF VOCAROO


1. One limitation of Vacaroo I have found out when I compared it to Sound Cloud- another audio recording tool (https://soundcloud.com/) is Vocaroo does not have the ability to allow the teacher or the listener to provide feedback by tying it at the exact second which Sound Cloud can do. This turns out causing the teacher to face some difficulties if he/she wants to give precise feedback on one particular moment at which the students say a point incorrectly, use the wrong words, or to praise a students for saying some points particularly well

2. Besides, Vocaroo does not have voice graph like what Sound Cloud has. I personally think that the voice graph would be very helpful for students when they are practising pronunciation and intonation as the graph allows the students to see their own rhythm of speech clearly and therefore, teacher can tell them which part need to be emphasised or lowered.


The Voice graph which Sound Cloud possesses but Vocaroo doesn't have it.


【MyBrainshark】: Video Presentations at Anytime, Anywhere

What is MyBrainshark?


Homepage of myBrainshark

MyBrainshark (http://my.brainshark.com/Home.aspxis an application that provides the opportunity to make instant creating, sharing and tracking online and mobile video presentations. With MyBrainshark, users can quickly turn an ordinary voiceless file into a voice-enriched presentation which can be accessed any time and anywhereAdditional features such as polls and quizzes can also be added. The final work can then be delivered via a Web link or can be embedded in a Web page, and users can track various statistics, including who viewed the presentations and time spent viewing it, and receive reports and alerts of viewing activity.


In brief, these are basically the five contents that you can upload to myBrainshark. They are PPT slides, Words Documents, Videos, Photos and Podcast (MP3/Voice Recording).


How to use MyBrainshark?


Generally, people can use myBrainshark to:
  • present tutorials, 
  • narrate products demo,
  • share experience, 
  • tell stories, 
  • describe a biography 
and many things more that you can actually think of. 

Besides, this webpage is free of charge and generally require only 20-30 minutes to create it depending on the length of content you would like to present. ALL you need is access to the internet and the sound enabled on your computer. That's it! However, do bear in mind that you actually would need to sign up before using it.

So, in fact, there are just few simple steps to create a myBrainshark presentation, as you can see from the chart below. You can also click here to view the step-by-step tutorial presented by myBrainshark or here for the tutorial by my lecturer, Russell Stannard. 


Easy peasy steps of using myBrainshark

After you have finished producing your presentation, these are the things which you can do:

  • Editing your presentation by adding /deleting slides 
  • Add in some questions (polls/survey) at the end & have the viewers respond to you. 
  • Download the whole presentation to your computer/phone for free. :)

The following is an example of MyBrainshark final outcome:


WHY IS MYBRAINSHARK USEFUL FOR TEACHERS AND STUDENTS?

 1. Motivating and engaging (Autonomous learning)


Students get the chance to decide on the content and the organisation of their own presentation. Then they are also encouraged to speak in target language at their own pace without feeling as tension as presenting a PPT presentation by standing in front of the classroom. In fact, using myBrainshark may be a better idea for students who just started practising doing oral presentation because they might not be able to use language so spontaneously and myBrainshark allows editing and it provides students opportunity to draft their speech first before presenting!

2. Students acquire Organising and Speaking skills


Since students need to upload files into myBrainshark and use voices to narrate it, students would have more room to practise using their voice to convey messages, such as they need to speak clearly and at a favourable speed and intonation. Moreover, they can learn how to organise the sequence of their points so that the viewers can make better sense of their speech by linking it to the slides shown.

How to use myBrainshark in an ELT context?


Individual work:  
Teacher can suggest students some topics to be discussed (eg: About me, the book I love the most, the nicest place that I have been to & etc.) and have them vote for their favourite one. Then teacher can monitor students' progression and give them a hand throughout the preparation stage of the presentation.


Pair work:
Teacher can post a couple of images on the class blog and have students download them and create a story themselves by arranging the images based on their own will. Teacher can let the students to create the drafts of their story lines in the class first, then they upload the images and do the recording at home by themselves.


Group work:
A video can be used to replace the images, and have students record their own videos (perhaps record during role playing in the class) as the continuation of the first video. This activity might be time consuming, but it actually depends on what are the aims & the learning outcomes the teacher opts for. 


SOME LIMITATIONS OF MYBRAINSHARK

I couldn't actually find out the exact limitations of myBrainshark. However, I have seen some of my colleagues' pages comment on these following points:

  • MyBrainshark only allows for voiced-based presentation, so students may have the script prepared and they just read it aloud. Therefore, its activities are kind of unsuitable to be used for language speaking skills assessment. 
  • Making a voiced presentation is a time consuming process and it often creates lots of noises, hence it is not suitable to be carried out in class.

However, in overall I do not feel that those have been mentioned are big problems because I believe that the effort which have been put in and the frequent practices which have been carried out by the students are far more valuable than the final result. And, I think it is very worth while for teachers to spare more time on students in scaffolding and guiding them to solve problems patiently. In fact, students' creativity cannot be forced as well, it is similar to what the saying has said- Rome wasn't built in a day~ :)


【Intervue】: The video recording tool for Q&A.

What is Intervue?


This is the homepage of the Intervue website.


Intervue (http://intervue.me/) is a website which allows people the opportunity to post questions about topics online and have people record their own 60-second video as a reply to those questions. The link of the questions can be posted to anywhere and assigned to whoever the author wants. It is done in an involving manner as this site favours the recording of video replies as the way in which insight and knowledge is shared. 

How to use Intervue?


Intervue has a very clean and clear webpage. One who has some basic technical knowledge will definitely know how to start using this website without much assistant. The following are five easy peasy steps to start setting up questions based on a particular topic:


This is the look of the page after you have set up your questions.

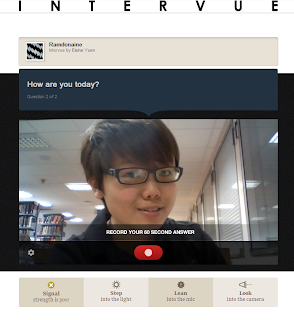
Next, in order to respond to a person's question in Intervue, you must have the link for the question. Once you have logged in to the question's page, a screen will appear and your webcam will be activated and is preparing to record. Click on the RED button at the bottom to start your recording. While responding to a question, you can watch you own facial expression from the screen. And bear in mind that, the maximum recording time is just 60 seconds. That is the end of  the recording after 60 seconds as the video will stop automatically by then. Therefore, it is very important for the responders to keep the answers concise.


This is how your monitor screen will look like when you are making
a recording of yourself answering a question.

Why do teacher and students like Intervue?


1.  Intervue has provided people an opportunity to have real live communication on the Internet. It motivates people to exchange ideas beyond the face-to-face tradition, which this could be the more relaxing one because it is not a direct live video. Intervue is a kind of private platform for people to communicate without feeling tensed or shy. Many people will still find Intervue a rather new and special way to interact, therefore they will feel more than happy to do so. 

And once a video reply has been posted, then other people can proceed to comment on it and remark how accurate that particular answer has been. Plus, each and every video reply that is posted can then be downloaded as a MP4, taken on your thumb drive and consulted when you are offline.

2. Students can practise their oral skill when the teacher has posted up some questions and have them answer the questions at home. As the students know that there are teacher and other students will be their audiences, they will organise their ideas to make sure that all can fit in 1 minute as well as will practise several times before sharing the one which they feel most satisfied with others. Besides, they can also be aware of their facial expressions and eye contact as well.


3.  It is of a higher possibility that students' oral skill is getting better and better every time they practise speaking by using Intervue. Therefore, Intervue can also be used as an e-Portfolio for teacher and students to keep an eye on their own progression of language speaking.


4. More expert students can also set up their own questions with the guidance from teacher and raise a discussion on a particular topic in a group manner. It is kind of motivating when students can come out with own questions which they feel curious about how the other students are going to respond to. This provides students a sense of ownership and they will feel happy when they get the reply from other students.    


How could Intervue be used in a language learning context?

1. Set up a topic and several questions

To start to use Intervue in most language learning context, a teacher can firstly suggest some general topics to students. For example, holiday, musics, festivals, free time (typical good day), role models, dreams and so forth. The topics covered have to be associated with something which have been taught in the class. Then, the right of topic choosing must be with the students because they are the people who are going to respond to the topic. Hence, the topic must be something which is appealing to them and can bring up their interest. The teacher can have the students vote for the best topic that they would like to respond to and set up questions together with them.

2. Do preparation before recording

Students can be guided by the teacher to create a framework/note on what to say in the video recording. For example, the questions is describe about your role model, and teacher can ask some guiding questions like "what has he/she done?" or "what values does he/she have?" for the students to make the people their role models. In addition, the teacher can also write some vocabulary items on the board to help the students in their preparation. After that, the students can practise saying to their partner first before starting the real recording. Teacher might also do an example before they start their recording.

** Speaking is the most cognitive activity to do, therefore with more speaking practices carried out, the students' capability to think fast would be enhanced.  .

3.  Responding to classmates' videos

Teacher can encourage the students to view each other's videos and have both teacher him/herself and other students to comment on them, perhaps from the content or grammatical point of view. The videos offer students a chance to share their stories and opinions with other students and the comment feature is a way to allow the students to express their ideas on the videos and provide the speaker some feedback so that he can make the speech better next time.


Some limitations of Intervue

  1. Intervue needs a rather fast internet connection so that it can perform its function to the fullest. Otherwise, the video might be just stuck at the middle of playing or recording.
  2. The video recording is always not spontaneous if it's used in a language lesson, as students are allowed some time to do preparation and perhaps make a list beforehand. However, I think this should not be a big problem because students' effort to practise and their improvement in speech and cognitive thinking are much more worth while.  


Thursday, 18 October 2012

【Bubblr】: the comic strip making tool


What is Bubblr?


Bubblr, a comic strip making software by PimPamPum.

Bubblr (http://www.pimpampum.net/bubblr/) is a free online software created by the company PimPamPum which allows its users to create a short comic/picture strips using the photos from Flickr.com. The users can also use their own photos if they have their own Flickr account.

ScreenShot 1: This is the homepage of the Bubblr website


How to use it?

 In order to create a comic/images strip in Bubblr, there are just a few easy and user friendly steps to follow. Here you go!

This flowchart shows the five simple steps to create Bubblr comic strip.


Why do teachers and student like Bubblr?


1. Personalisation- Bubblr is all about personalisation and ownership. It gives teacher and students the opportunity to create own images strips based on own creativity and ways of expressing ideas. Students' creativity and thinking skills can be enhanced when they are planning their ideas as well as choosing and organising the images and putting in bubbles.


2. Engaging- It also has provided a chance for teacher to make the classroom learning environment to be more engaging because Bubblr is a combination of things such as choosing pictures and put in captions which students would be enjoy doing so much!


3. Building up writing skills- Students' writing skills can be built up slowly when they are trying to opt for the most suitable words to put in the bubbles in order to describe their images and convey their messages successfully.


How can Bubblr be used in ELT classroom?


1.   Historical timeline- Bubblr would be a amazing tool used to illustrate a historical timeline because by its dynamic timeline structure.

For example, teacher can have students to produce a Bubblr strip to narrate the history of the students themselves. It could be a picture for each year, starting from the year they were born until the year which they are in now. 

2. Procedure describing- Due to the scrolling linear feature of Bubblr, it can also be a great tool for students to describe the step-by-step procedures of performing an activity. 

For example, the procedure of making a chocolate cake and the correct steps of brushing teeth. With the accompany of images and bubbles, the strip will look livelier if compared to the traditional flowchart.

3.    Story creating based on images given by teacherIf a class has a Flickr account, it then allows the teacher to direct students to a certain resource and certain images to use. 

For example, the teacher can upload a couple of images onto Flickr and have the students access them using the class username, then the teacher will ask the students to rearrange the images based on their imagination, and create a short story from that. 

Some limitations of Bubblr

Despite of all the usefulness which have been stated above, Bubblr actually does have limitation as well.

1. Image placing- Once the images have been dragged down to the linear timeline structure, they cant be move around just by dragging. If the user has mistakenly put an image in a wrong place, he/she has to delete the image and add it again at the right position.

2. Bubble size- The thinking/ text bubble cannot be resized. Sometimes, the whole image would look nicer if the bubble can be resized and be put at the right position. 

3. Bubble arrow- the arrow can just be moved around at the bottom of the bubble, but not at the side. It would make the placing of the bubble difficult occasionally if the user wants to point the arrow to something at the side of the bubble and do not want to block some part of the image.


Below is an example I did using Bubblr. The topic is Italy- which is one of the country I like the most. And this strip is showing some of the Italy main attractions and also my favourite Italian food. Enjoy and start to make yours too! (^_^)


For more detailed information, please visit http://www.teachertrainingvideos.com/bubblr/index.html. This is a teacher training video specially produced by my lecturer, Russell Stannard on the topic of how to use Bubblr.


Monday, 17 December 2012

【Wordsift】: The Word Cloud Generator

What is Word Cloud?


This is an example of a word cloud? What do you think the topic is about?

Word Cloud turns text into a visual representation or an information graphic. They are easily created by pasting text in any language into a free word cloud generator, such as Wordsift and Wordle. The word clouds, or visual representations of text, give prominence to words that appear more frequently from the original text – in other words, the more frequently a word appears in the text, the larger its size in the visual design. Besides, users can normally print out their clouds or embed them into their blogs or websites.


         Introducing WordSift. How to use it?


WordSift (http://www.wordsift.com/is an online word cloud generator that I found very useful in certain aspects in teaching language. Its webpage is very straight forward and easy to use. There are just two steps to create your own word cloud:
  • Copy your text and paste it in the box at the homepage
  • Press "sift" to visualise your text

These are all you have to do! ;)


  Why do teachers and students like WordSift?


What I like about WordSift is that actually not just about it can create pretty images with words, instead, this website can also be a great visualisation tool that can become a catalyst for discovery, understanding, insight and discussion with students about a particular text or texts!

The following are some of the functions that WordSift can perform:


Concordance Analysis

1. If any of the words in your word cloud is clicked, you will be shown at the bottom of the page that how this particular chosen word is used in the text that you have pasted in. it is effectively concordance analysis of the words in the text. Hence, it is a potentially great tool in just focus on a/ some word(s) and teachers can use this opportunity to highlight the different usages of the same word in the passage to their students.

As soon as the word "Atmosphere" is being chosen, WordSift will automatically show you where this particular word is used in your text.

Organise words based on Frequency of use, 

Alphabets and Genres


Word Cloud for a text about Greenhouse Effects
The word cloud will show you the 50 most frequent words which are used in the text you have pasted in and they are sized differently based on the frequency of use of the certain word in the text. For example (See the left), I have pasted a text about greenhouse effects in WordSift. Then, my word cloud have had all the most frequently used words such as atmosphere, greenhouse, earth. energy, gases and global appeared in larger size compared to the rest.

Besides, WordSift enables users to organise the words based on their frequency of use in English. In this way, students can straight away view the differences very clearly and learn some of the most common words used in English. To organise the words, you can just click on “common to rare” or “rare to common”. In addition, you can also organise the words alphabetically and you can also use it to analyse words from different genres. For example, you can choose to highlight all the words related to either Science, Math, Academic Writing, General Services and etc. (See below)
 After I clicked on the "Science" button in the "Mark" column, all the words related to Science is highlighted in RED colour 


Show words related images, videos & Thesaurus

What's interesting is, WordSift will present a series of pictures and videos which are related to the selected words in order to assist the users to understand the words meaning quickly and more in depth. Moreover, if you click on any of the words in the word cloud, you will also see a visual thesaurus where the word and its related meanings are shown pictorially. 


When I click on the word "atmosphere", 
images and videos related as well as thesaurus are shown at the bottom of the page.


How can WordSift be used in an ELT context?


Prediction

  1. The teacher creates a cloud and then show it to the students in the class. 
  2. Based on the cloud, students have to predict what the topic is or what the content of the text might be. 
  3. Perhaps some comprehension questions can be asked by the teacher as well, and students have to predict the answers by referring to the cloud. 
It will be so interesting to contrast the students' predictions about the text when looking at the cloud and then what the actual content of the text is. In fact, this activity can be carried out as a class activity or teacher can print out clouds and give them out in groups.

Dealing with vocabulary

  1. You can paste a text which you want your students to read later into WordSift and produce a cloud.
  2. Then, ask the students to look at the cloud and choose 3 words they do not understand. 
Benefits: 
  1. It is time saving and easier for the teacher to deal with the vocabulary problems since students do not need to read through the whole text but instead, just look for the unfamiliar vocabulary items within the 50 most frequently used words in the text. 
  2. It is easier for teacher to mainly focus on the most common/ important keywords in the text because those words are put in a larger font size. Therefore, teacher can only choose to explain the meaning of the big-sized words to students. Whereas the rest can be skipped since do not understand about the meaning of those words would not really affect the students' comprehension of the text.

Comparisons

  1. Get students to make word clouds of their own essays. They can make them at home, print them out and then bring them into the class.
  2. In the class, students can be put into pairs. 
  3. Have Student A to predict 3 contents of the essay from student B’s cloud and student B does the same with student A’s cloud. 
  4. ** If all the students have written the same composition, then students could compare their clouds to see which words they have in common and write them down in a list.

Some limitations of wordsift

  1. Not colourful enough / Only have one font type 

The cloud produced are all in green colour and if you clicked on some words or genres, those word will change to red colour. That's it! Hence it would be kind of boring for students because most students like colourful stuffs with pictures.

  2. The clouds produced are not in certain shape but randomly arranged.

Unlike Tagxedo and Wordle (another two word cloud generators), Wordsift does not have the function to arrange its cloud into certain shapes and therefore, makes the appearance of the cloud rather dull.

As you can see below, the cloud produced by Tagxedo and Wordle are much more colourful and good looking than that from WordSift. And they have different font types to be chosen from too!

Examples of clouds from Tagxedo:


Examples of clouds from Wordle:


===

Saturday, 8 December 2012

【Zimmer Twins】: Directing your own stories

What is The Zimmer Twins?


The Zimmer Twins (http://www.zimmertwins.com/) is known for its unique format which combines online participation and broadcast delivery. Young language learners are invited to create and share animated episodes using a story editor and library of animation. The users can either create endings to short, professionally produced story-starters or produce a totally new story based on their imagination. Users tell their stories by choosing characters, actions, props, expressions and settings. They can also add their own dialogue and on-screen text. Then, a selection of the user-generated episodes is produced into broadcast shorts and air on Teletoon, which is a Canadian Animation Network.


Below is an interesting Youtube video on "The Making of The Zimmer Twins" :


How to use The Zimmer Twins?


1. Click on the "Make a Movie" button and you will be brought to this page.

In order to have your clip saved, you must sign up yourself first to get an account for the Zimmer Twins page. After that, you can start making your own movie clip.  Click here to watch a tutorial clip on how to get started with your first Zimmer Twins movie!


1. You can either choose to create endings to short, professionally produced story-starters or produce a totally new story based on your own imagination. If you choose the previous, you need to pick a story-starter from the selection on the screen; but if you choose to create your own, you can click in the "Make From Scratch" button.

Then you will be brought to this story editor where you can start creating your story 

2. From the story editor, you can get many varieties of animation selection, such as you can choose your own characters, settings and props. After that, you are free to decide each character's facial expressions, emotions as well as actions. Also, you can add on dialogue and on screen text on your short animation clip. This is so fun! Even me as a teacher feel so exciting in creating my own animation. Look at the slide show below, it shows you a series of animated files which Zimmer Twins offers: 


3. After you have finished narrating your story, just click on "save movie" button before you put in a lovely title and short description for your story.

For more information on how to use the Zimmer Twins, please view the teaching video below prepared by Russel Stannard:  http://www.teachertrainingvideos.com/zimmer/index.html


Why do teacher and students like the Zimmer Twins?


1. Autonomous learning 

Students will become more independent in learning because they are the one who in charge for every tiny part of their movies. They can do whatever they want, such as choosing their favourite characters, deciding on the characters' lines, story background and etc. Students' thinking skills can be also enhanced greatly as they produce the movies all by themselves, and perhaps with only some guidance from the teacher.

2. Fun and Motivating

Zimmer Twins offers different characters with different personalities and traits for the students to choose from. The characters can sing and dance, can travel on time and do some craziest stuffs. It totally opens up the door of possibilities of what the students can actually think of. The anticipation and preparation of students to add dialogue, select scenes and come up with their own story endings are absolutely worth while and amazing! It is really cool when you see that students come out with different stories every time and you can totally enjoy their awesomeness!

3. Sense of ownership

Students will have a sense of ownership towards their finished works because they have put in a lot of effort in organising their ideas and present their story in a nice and favourable way. Therefore, after putting in so much hard work, they will feel proud of it and enjoy the feeling when people appreciate their works.

How could Zimmer Twins be used in language learning context?


1.  Teacher sets a context and has the students to create a story about it

As you can see from the heading that a teacher can actually provide the students with an interesting title or context such as sports day, rescuing someone from a difficult situation, an argument and etc. Then gives the students more room to imagine themselves about how they want the story line to be. At the same time, the teacher can introduce the students to a meaningful set of vocabulary related to that particular context so that they can put the vocabulary items into usage when they are setting up their own stories. After all, the movie making has been turned into a kind of personal process where the students can do whatever they want in the movie before publish it to their audience. In fact, not only the activity encourages students autonomy and creativity, but also helps them in contextualising a situation/incident and learning to use suitable words to describe it.

2. Students create story endings based on the story starters

Like what you can see in Zimmer Twins' page, students are given the opportunity to continue progressing the story line of some uncompleted movies into the complete ones. Hence, the short plus professionally produced story starter can assist students to activate their background knowledge about some events, and then they come out with some extraordinary ideas to finish the story. Students are given freedom and right to decide how the ending of the story would be. Therefore, this can highly motivate them as different students have different creativity level. Besides, students will feel so much delighted if they can share and exchange ideas on each other's story.


Some limitations of The Zimmer Twins


1. Movie cannot be embedded


The biggest limitation of Zimmer Twins is it does not allow the users to embed their finished works into any other websites or blogs. This is kind of sad because students cannot share their works with other people who are not Zimmer Twins users.

2. Have to pay for VIP Membership

The users have to purchase VIP membership so that they can publish their movies publicly and have other users watching them.


Thursday, 1 November 2012

【Vocaroo Voice Message】: The voice recording service


What is Vocaroo?


Vocaroo- The premier voice recording service

Vocaroo (http://vocaroo.com/) is an easy and free service that allows users to create audio recordings for use in slide shows or in blogs and websites without the need to install any software. You do not even have to create an account to use Vocaroo. All you need to provide is a microphone.

How to use Vocaroo?


To create a recording just go to Vocaroo.com, click record, grant Vocaroo access to your microphone, and start talking. After completing your recording, Vocaroo gives you the choice to publish it or to scrap it and try again. When you press "publish" and embed the code in your website, you will see a lovely little player which you could click to play your voice.


Step 1:  Go to Vocaroo webpage, and when you are ready,
press on "Click to Record" button to start your recording.

When you have finished your speech, press "click to stop".

Then it lets you to rerecord again if you are unhappy with your recording.
If not, click the link to save.

Ok, it's now pretty much done.
Now you can copy the code and embed
into your blog or website that you would like to.


Below is an example of audio file I have recorded:


Why do teacher and students like Vocaroo?


1. Free and Easy 

Vocaroo has a clean webpage and it allows teacher and students to start recording straight away without having to sign up to be a member or install any additional software. And the instruction in its website is clear enough, even first time users can definitely understand how to use it. Vocaroo also allows users to download the recorded audio and save it as MP3. 

2. No fixed limit on message length 

This means that teacher and students can use Vocaroo to record as long message as they like. However, people have to be aware that even brief internet connection outages can cause recording to be stopped or to fail, and with longer recordings the chance of this increases. Despite of these, I still believe that no fixed limit for recording time is always the biggest benefit of Vocaroo.

3. Time Saving

Teacher and students can use Vocaroo at home to record their speech beforehand and directly play it in the classroom. For example, teacher can assign a task for students and have them to respond through Vocaroo at home and embed the link of their responses into their blogs. The students do not have to stand up one by one and tell the teacher their stories. Besides, if the teacher was unable to come to school on a particular day, he/she can also inform students to listen to his/her pre-recorded Vocaroo file from the class blog so that they won't miss the content of the class.


How can Vocaroo be used in a language learning context?

1. Story Telling

The teacher can start the lesson by showing an example to students- telling them a story, for example on the topic of "the most happiest day in my life". After that, teacher has students divide themselves into groups of 3 to 4. This is to provide them more practising opportunity later on when they narrate their stories to the group members before recording. Then, the teacher can offer students some stimulus by asking them some guiding questions such as "What has happened in the day?", "Which situation made you so happy?", "Who was in the scene?" and so forth. After that, teacher can have students to record at home, either in pair or individual and post it in class blog. Then teacher can provide feedback to students on the pace/organisation/grammar of the story. The students with the best stories can also come in front to present to the whole class in the next lesson.


2. Information gap activity

Teacher starts the lesson by giving the students an extract (the beginning part) of a story in the class blog. Or another way to provide the students with stimulus is by showing students some pictures. Then the story continues to go on by having a student to record a short piece of story recording everyday. The teacher can have students to draw lot before starting to decide the students' sequence of continuing the story. This activity is kind of engaging and motivating because there is an information gap and the students feel curious and they want to know how other students are going to continue the story. In this way, their interest and motivation are aroused. And at the same time, their oral skill are trained because they have to organise their ideas and sentences as well as to choose the right words so that they message can be conveyed effectively.


SOME LIMITATIONS OF VOCAROO


1. One limitation of Vacaroo I have found out when I compared it to Sound Cloud- another audio recording tool (https://soundcloud.com/) is Vocaroo does not have the ability to allow the teacher or the listener to provide feedback by tying it at the exact second which Sound Cloud can do. This turns out causing the teacher to face some difficulties if he/she wants to give precise feedback on one particular moment at which the students say a point incorrectly, use the wrong words, or to praise a students for saying some points particularly well

2. Besides, Vocaroo does not have voice graph like what Sound Cloud has. I personally think that the voice graph would be very helpful for students when they are practising pronunciation and intonation as the graph allows the students to see their own rhythm of speech clearly and therefore, teacher can tell them which part need to be emphasised or lowered.


The Voice graph which Sound Cloud possesses but Vocaroo doesn't have it.


【MyBrainshark】: Video Presentations at Anytime, Anywhere

What is MyBrainshark?


Homepage of myBrainshark

MyBrainshark (http://my.brainshark.com/Home.aspxis an application that provides the opportunity to make instant creating, sharing and tracking online and mobile video presentations. With MyBrainshark, users can quickly turn an ordinary voiceless file into a voice-enriched presentation which can be accessed any time and anywhereAdditional features such as polls and quizzes can also be added. The final work can then be delivered via a Web link or can be embedded in a Web page, and users can track various statistics, including who viewed the presentations and time spent viewing it, and receive reports and alerts of viewing activity.


In brief, these are basically the five contents that you can upload to myBrainshark. They are PPT slides, Words Documents, Videos, Photos and Podcast (MP3/Voice Recording).


How to use MyBrainshark?


Generally, people can use myBrainshark to:
  • present tutorials, 
  • narrate products demo,
  • share experience, 
  • tell stories, 
  • describe a biography 
and many things more that you can actually think of. 

Besides, this webpage is free of charge and generally require only 20-30 minutes to create it depending on the length of content you would like to present. ALL you need is access to the internet and the sound enabled on your computer. That's it! However, do bear in mind that you actually would need to sign up before using it.

So, in fact, there are just few simple steps to create a myBrainshark presentation, as you can see from the chart below. You can also click here to view the step-by-step tutorial presented by myBrainshark or here for the tutorial by my lecturer, Russell Stannard. 


Easy peasy steps of using myBrainshark

After you have finished producing your presentation, these are the things which you can do:

  • Editing your presentation by adding /deleting slides 
  • Add in some questions (polls/survey) at the end & have the viewers respond to you. 
  • Download the whole presentation to your computer/phone for free. :)

The following is an example of MyBrainshark final outcome:


WHY IS MYBRAINSHARK USEFUL FOR TEACHERS AND STUDENTS?

 1. Motivating and engaging (Autonomous learning)


Students get the chance to decide on the content and the organisation of their own presentation. Then they are also encouraged to speak in target language at their own pace without feeling as tension as presenting a PPT presentation by standing in front of the classroom. In fact, using myBrainshark may be a better idea for students who just started practising doing oral presentation because they might not be able to use language so spontaneously and myBrainshark allows editing and it provides students opportunity to draft their speech first before presenting!

2. Students acquire Organising and Speaking skills


Since students need to upload files into myBrainshark and use voices to narrate it, students would have more room to practise using their voice to convey messages, such as they need to speak clearly and at a favourable speed and intonation. Moreover, they can learn how to organise the sequence of their points so that the viewers can make better sense of their speech by linking it to the slides shown.

How to use myBrainshark in an ELT context?


Individual work:  
Teacher can suggest students some topics to be discussed (eg: About me, the book I love the most, the nicest place that I have been to & etc.) and have them vote for their favourite one. Then teacher can monitor students' progression and give them a hand throughout the preparation stage of the presentation.


Pair work:
Teacher can post a couple of images on the class blog and have students download them and create a story themselves by arranging the images based on their own will. Teacher can let the students to create the drafts of their story lines in the class first, then they upload the images and do the recording at home by themselves.


Group work:
A video can be used to replace the images, and have students record their own videos (perhaps record during role playing in the class) as the continuation of the first video. This activity might be time consuming, but it actually depends on what are the aims & the learning outcomes the teacher opts for. 


SOME LIMITATIONS OF MYBRAINSHARK

I couldn't actually find out the exact limitations of myBrainshark. However, I have seen some of my colleagues' pages comment on these following points:

  • MyBrainshark only allows for voiced-based presentation, so students may have the script prepared and they just read it aloud. Therefore, its activities are kind of unsuitable to be used for language speaking skills assessment. 
  • Making a voiced presentation is a time consuming process and it often creates lots of noises, hence it is not suitable to be carried out in class.

However, in overall I do not feel that those have been mentioned are big problems because I believe that the effort which have been put in and the frequent practices which have been carried out by the students are far more valuable than the final result. And, I think it is very worth while for teachers to spare more time on students in scaffolding and guiding them to solve problems patiently. In fact, students' creativity cannot be forced as well, it is similar to what the saying has said- Rome wasn't built in a day~ :)


【Intervue】: The video recording tool for Q&A.

What is Intervue?


This is the homepage of the Intervue website.


Intervue (http://intervue.me/) is a website which allows people the opportunity to post questions about topics online and have people record their own 60-second video as a reply to those questions. The link of the questions can be posted to anywhere and assigned to whoever the author wants. It is done in an involving manner as this site favours the recording of video replies as the way in which insight and knowledge is shared. 

How to use Intervue?


Intervue has a very clean and clear webpage. One who has some basic technical knowledge will definitely know how to start using this website without much assistant. The following are five easy peasy steps to start setting up questions based on a particular topic:


This is the look of the page after you have set up your questions.

Next, in order to respond to a person's question in Intervue, you must have the link for the question. Once you have logged in to the question's page, a screen will appear and your webcam will be activated and is preparing to record. Click on the RED button at the bottom to start your recording. While responding to a question, you can watch you own facial expression from the screen. And bear in mind that, the maximum recording time is just 60 seconds. That is the end of  the recording after 60 seconds as the video will stop automatically by then. Therefore, it is very important for the responders to keep the answers concise.


This is how your monitor screen will look like when you are making
a recording of yourself answering a question.

Why do teacher and students like Intervue?


1.  Intervue has provided people an opportunity to have real live communication on the Internet. It motivates people to exchange ideas beyond the face-to-face tradition, which this could be the more relaxing one because it is not a direct live video. Intervue is a kind of private platform for people to communicate without feeling tensed or shy. Many people will still find Intervue a rather new and special way to interact, therefore they will feel more than happy to do so. 

And once a video reply has been posted, then other people can proceed to comment on it and remark how accurate that particular answer has been. Plus, each and every video reply that is posted can then be downloaded as a MP4, taken on your thumb drive and consulted when you are offline.

2. Students can practise their oral skill when the teacher has posted up some questions and have them answer the questions at home. As the students know that there are teacher and other students will be their audiences, they will organise their ideas to make sure that all can fit in 1 minute as well as will practise several times before sharing the one which they feel most satisfied with others. Besides, they can also be aware of their facial expressions and eye contact as well.


3.  It is of a higher possibility that students' oral skill is getting better and better every time they practise speaking by using Intervue. Therefore, Intervue can also be used as an e-Portfolio for teacher and students to keep an eye on their own progression of language speaking.

4. More expert students can also set up their own questions with the guidance from teacher and raise a discussion on a particular topic in a group manner. It is kind of motivating when students can come out with own questions which they feel curious about how the other students are going to respond to. This provides students a sense of ownership and they will feel happy when they get the reply from other students.    


How could Intervue be used in a language learning context?

1. Set up a topic and several questions

To start to use Intervue in most language learning context, a teacher can firstly suggest some general topics to students. For example, holiday, musics, festivals, free time (typical good day), role models, dreams and so forth. The topics covered have to be associated with something which have been taught in the class. Then, the right of topic choosing must be with the students because they are the people who are going to respond to the topic. Hence, the topic must be something which is appealing to them and can bring up their interest. The teacher can have the students vote for the best topic that they would like to respond to and set up questions together with them.

2. Do preparation before recording

Students can be guided by the teacher to create a framework/note on what to say in the video recording. For example, the questions is describe about your role model, and teacher can ask some guiding questions like "what has he/she done?" or "what values does he/she have?" for the students to make the people their role models. In addition, the teacher can also write some vocabulary items on the board to help the students in their preparation. After that, the students can practise saying to their partner first before starting the real recording. Teacher might also do an example before they start their recording.

** Speaking is the most cognitive activity to do, therefore with more speaking practices carried out, the students' capability to think fast would be enhanced.  .

3.  Responding to classmates' videos

Teacher can encourage the students to view each other's videos and have both teacher him/herself and other students to comment on them, perhaps from the content or grammatical point of view. The videos offer students a chance to share their stories and opinions with other students and the comment feature is a way to allow the students to express their ideas on the videos and provide the speaker some feedback so that he can make the speech better next time.


Some limitations of Intervue

  1. Intervue needs a rather fast internet connection so that it can perform its function to the fullest. Otherwise, the video might be just stuck at the middle of playing or recording.
  2. The video recording is always not spontaneous if it's used in a language lesson, as students are allowed some time to do preparation and perhaps make a list beforehand. However, I think this should not be a big problem because students' effort to practise and their improvement in speech and cognitive thinking are much more worth while.  


Thursday, 18 October 2012

【Bubblr】: the comic strip making tool


What is Bubblr?


Bubblr, a comic strip making software by PimPamPum.

Bubblr (http://www.pimpampum.net/bubblr/) is a free online software created by the company PimPamPum which allows its users to create a short comic/picture strips using the photos from Flickr.com. The users can also use their own photos if they have their own Flickr account.

ScreenShot 1: This is the homepage of the Bubblr website


How to use it?

 In order to create a comic/images strip in Bubblr, there are just a few easy and user friendly steps to follow. Here you go!

This flowchart shows the five simple steps to create Bubblr comic strip.


Why do teachers and student like Bubblr?


1. Personalisation- Bubblr is all about personalisation and ownership. It gives teacher and students the opportunity to create own images strips based on own creativity and ways of expressing ideas. Students' creativity and thinking skills can be enhanced when they are planning their ideas as well as choosing and organising the images and putting in bubbles.


2. Engaging- It also has provided a chance for teacher to make the classroom learning environment to be more engaging because Bubblr is a combination of things such as choosing pictures and put in captions which students would be enjoy doing so much!


3. Building up writing skills- Students' writing skills can be built up slowly when they are trying to opt for the most suitable words to put in the bubbles in order to describe their images and convey their messages successfully.


How can Bubblr be used in ELT classroom?


1.   Historical timeline- Bubblr would be a amazing tool used to illustrate a historical timeline because by its dynamic timeline structure.

For example, teacher can have students to produce a Bubblr strip to narrate the history of the students themselves. It could be a picture for each year, starting from the year they were born until the year which they are in now. 

2. Procedure describing- Due to the scrolling linear feature of Bubblr, it can also be a great tool for students to describe the step-by-step procedures of performing an activity. 

For example, the procedure of making a chocolate cake and the correct steps of brushing teeth. With the accompany of images and bubbles, the strip will look livelier if compared to the traditional flowchart.

3.    Story creating based on images given by teacherIf a class has a Flickr account, it then allows the teacher to direct students to a certain resource and certain images to use. 

For example, the teacher can upload a couple of images onto Flickr and have the students access them using the class username, then the teacher will ask the students to rearrange the images based on their imagination, and create a short story from that. 

Some limitations of Bubblr

Despite of all the usefulness which have been stated above, Bubblr actually does have limitation as well.

1. Image placing- Once the images have been dragged down to the linear timeline structure, they cant be move around just by dragging. If the user has mistakenly put an image in a wrong place, he/she has to delete the image and add it again at the right position.

2. Bubble size- The thinking/ text bubble cannot be resized. Sometimes, the whole image would look nicer if the bubble can be resized and be put at the right position. 

3. Bubble arrow- the arrow can just be moved around at the bottom of the bubble, but not at the side. It would make the placing of the bubble difficult occasionally if the user wants to point the arrow to something at the side of the bubble and do not want to block some part of the image.


Below is an example I did using Bubblr. The topic is Italy- which is one of the country I like the most. And this strip is showing some of the Italy main attractions and also my favourite Italian food. Enjoy and start to make yours too! (^_^)


For more detailed information, please visit http://www.teachertrainingvideos.com/bubblr/index.html. This is a teacher training video specially produced by my lecturer, Russell Stannard on the topic of how to use Bubblr.